Trying to make an image clickable in React Native? It was one of the harder things for me to do when I started off so I thought I’d do a quick write up on spinning up touchable components.
My Setup
- MacOS Big Sur
- Webstorm 2020.2.3
Starting a New React Native Project
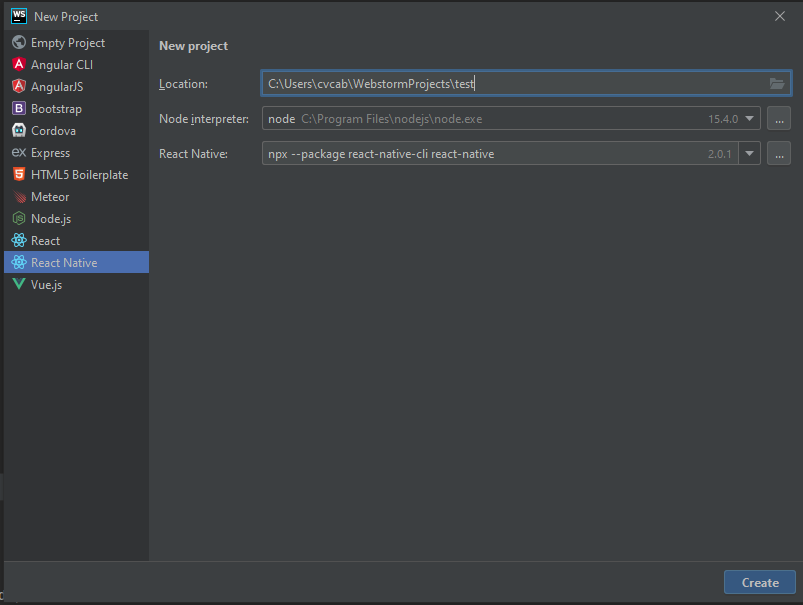
Click React Native under new project in Webstorm. This will give you some out of the box functionality like debugging. It’ll be a few minutes before your project finishes getting set up, how about you grab yourself a cup of coffee in the mean time?
Your Project Structure
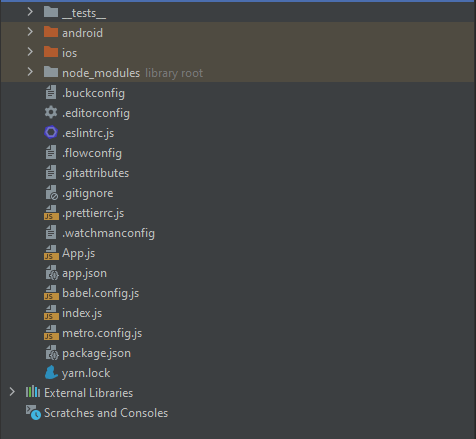
So Webstorm created the folders shown above. We’ll be adding an additional assets folder to hold our downloaded image which we’ll be using as a button. We will not be touching the ios, android, _tests_, or node_modules folders. The node_modules folder generally doesn’t get touched. It holds all of our node modules.
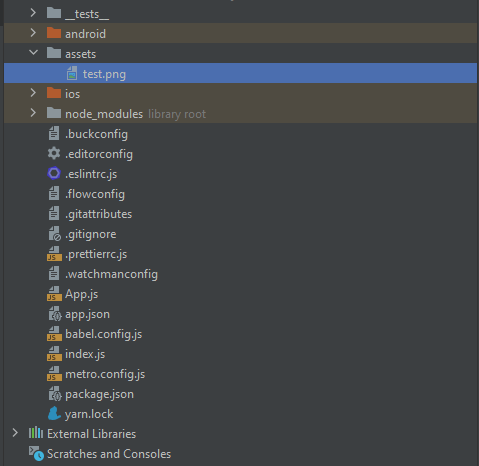
Download this photo. Then let’s drag it into the assets folder that we just created. I saved the photo as test.png. You can see it below.
#/media/File:React-icon.svg)
Making the Image Button
Next, we’ll focus on the actual button creation. Open up App.js in your editor. This is what I’m seeing initially.
/**
 * Sample React Native App
 * https://github.com/facebook/react-native
 *
 * @format
 * @flow strict-local
 */

import React from 'react';
import {
  SafeAreaView,
  StyleSheet,
  ScrollView,
  View,
  Text,
  StatusBar,
} from 'react-native';

import {
  Header,
  LearnMoreLinks,
  Colors,
  DebugInstructions,
  ReloadInstructions,
} from 'react-native/Libraries/NewAppScreen';

const App: () => React$Node = () => {
  return (
    <>
      <StatusBar barStyle="dark-content" />
      <SafeAreaView>
        <ScrollView
          contentInsetAdjustmentBehavior="automatic"
          style={styles.scrollView}>
          <Header />
          {global.HermesInternal == null ? null : (
            <View style={styles.engine}>
              <Text style={styles.footer}>Engine: Hermes</Text>
            </View>
          )}
          <View style={styles.body}>
            <View style={styles.sectionContainer}>
              <Text style={styles.sectionTitle}>Step One</Text>
              <Text style={styles.sectionDescription}>
                Edit <Text style={styles.highlight}>App.js</Text> to change this
                screen and then come back to see your edits.
              </Text>
            </View>
            <View style={styles.sectionContainer}>
              <Text style={styles.sectionTitle}>See Your Changes</Text>
              <Text style={styles.sectionDescription}>
                <ReloadInstructions />
              </Text>
            </View>
            <View style={styles.sectionContainer}>
              <Text style={styles.sectionTitle}>Debug</Text>
              <Text style={styles.sectionDescription}>
                <DebugInstructions />
              </Text>
            </View>
            <View style={styles.sectionContainer}>
              <Text style={styles.sectionTitle}>Learn More</Text>
              <Text style={styles.sectionDescription}>
                Read the docs to discover what to do next:
              </Text>
            </View>
            <LearnMoreLinks />
          </View>
        </ScrollView>
      </SafeAreaView>
    </>
  );
};

const styles = StyleSheet.create({
  scrollView: {
    backgroundColor: Colors.lighter,
  },
  engine: {
    position: 'absolute',
    right: 0,
  },
  body: {
    backgroundColor: Colors.white,
  },
  sectionContainer: {
    marginTop: 32,
    paddingHorizontal: 24,
  },
  sectionTitle: {
    fontSize: 24,
    fontWeight: '600',
    color: Colors.black,
  },
  sectionDescription: {
    marginTop: 8,
    fontSize: 18,
    fontWeight: '400',
    color: Colors.dark,
  },
  highlight: {
    fontWeight: '700',
  },
  footer: {
    color: Colors.dark,
    fontSize: 12,
    fontWeight: '600',
    padding: 4,
    paddingRight: 12,
    textAlign: 'right',
  },
});

export default App;
Let’s delete everything from <Header /> up until the close view tag right after LearnMoreLinks. We should be left with the following.
/**
 * Sample React Native App
 * https://github.com/facebook/react-native
 *
 * @format
 * @flow strict-local
 */

import React from 'react';
import {
  SafeAreaView,
  StyleSheet,
  ScrollView,
  View,
  Text,
  StatusBar,
} from 'react-native';

import {
  Header,
  LearnMoreLinks,
  Colors,
  DebugInstructions,
  ReloadInstructions,
} from 'react-native/Libraries/NewAppScreen';

const App: () => React$Node = () => {
  return (
    <>
      <StatusBar barStyle="dark-content" />
      <SafeAreaView>
        <ScrollView
          contentInsetAdjustmentBehavior="automatic"
          style={styles.scrollView}>

        </ScrollView>
      </SafeAreaView>
    </>
  );
};

const styles = StyleSheet.create({
  scrollView: {
    backgroundColor: Colors.lighter,
  },
  engine: {
    position: 'absolute',
    right: 0,
  },
  body: {
    backgroundColor: Colors.white,
  },
  sectionContainer: {
    marginTop: 32,
    paddingHorizontal: 24,
  },
  sectionTitle: {
    fontSize: 24,
    fontWeight: '600',
    color: Colors.black,
  },
  sectionDescription: {
    marginTop: 8,
    fontSize: 18,
    fontWeight: '400',
    color: Colors.dark,
  },
  highlight: {
    fontWeight: '700',
  },
  footer: {
    color: Colors.dark,
    fontSize: 12,
    fontWeight: '600',
    padding: 4,
    paddingRight: 12,
    textAlign: 'right',
  },
});

export default App;
We should end up with an empty screen containing only an empty scroll view. Now we can add the image to the page. It’ll now look like the following. I’ve also changed the background color to black and decided to center the image. Check out this article which touches on a similar topic.
Now we have the image, but it isn’t clickable. We can’t make the app do anything by clicking the image. That’s why we need to wrap it in React Native’s TouchableOpacity which will give us access to the onPress prop.
/**
 * Sample React Native App
 * https://github.com/facebook/react-native
 *
 * @format
 * @flow strict-local
 */

import React from 'react';
import {SafeAreaView, ScrollView, StatusBar, StyleSheet} from 'react-native';

import {Colors} from 'react-native/Libraries/NewAppScreen';

import {Image} from 'react-native';
import test from './assets/test.png'
const App: () => React$Node = () => {
  return (
    <>
      <StatusBar barStyle="dark-content" />
      <SafeAreaView>
        <ScrollView
          contentInsetAdjustmentBehavior="automatic"
          style={styles.scrollView}>
          <Image
            source={require('./assets/test.png')}
            style={{resizeMode: 'contain', width: 250, alignSelf: 'center'}}
          />
        </ScrollView>
      </SafeAreaView>
    </>
  );
};

const styles = StyleSheet.create({
  scrollView: {
    backgroundColor: '#000000',
  },
  engine: {
    position: 'absolute',
    right: 0,
  },
  body: {
    backgroundColor: Colors.white,
  },
  sectionContainer: {
    marginTop: 32,
    paddingHorizontal: 24,
  },
  sectionTitle: {
    fontSize: 24,
    fontWeight: '600',
    color: Colors.black,
  },
  sectionDescription: {
    marginTop: 8,
    fontSize: 18,
    fontWeight: '400',
    color: Colors.dark,
  },
  highlight: {
    fontWeight: '700',
  },
  footer: {
    color: Colors.dark,
    fontSize: 12,
    fontWeight: '600',
    padding: 4,
    paddingRight: 12,
    textAlign: 'right',
  },
});

export default App;
The code will now look like what we have above without the TouchableOpacity. Make sure to import the Image from react-native! Adding touchable opacity makes your code look like this: This should still not do anything. We need to make use of the onPress prop for something to happen.
/**
 * Sample React Native App
 * https://github.com/facebook/react-native
 *
 * @format
 * @flow strict-local
 */

import React from 'react';
import {SafeAreaView, ScrollView, StatusBar, StyleSheet} from 'react-native';

import {Colors} from 'react-native/Libraries/NewAppScreen';

import {Image, TouchableOpacity} from 'react-native';
import test from './assets/test.png'
const App: () => React$Node = () => {
  return (
    <>
      <StatusBar barStyle="dark-content" />
      <SafeAreaView>
        <ScrollView
          contentInsetAdjustmentBehavior="automatic"
          style={styles.scrollView}>
          <TouchableOpacity>
          <Image
              source={require('./assets/test.png')}
              style={{resizeMode: 'contain', width: 250, alignSelf: 'center'}}
            />
          </TouchableOpacity>
        </ScrollView>
      </SafeAreaView>
    </>
  );
};

const styles = StyleSheet.create({
  scrollView: {
    backgroundColor: '#000000',
  },
  engine: {
    position: 'absolute',
    right: 0,
  },
  body: {
    backgroundColor: Colors.white,
  },
  sectionContainer: {
    marginTop: 32,
    paddingHorizontal: 24,
  },
  sectionTitle: {
    fontSize: 24,
    fontWeight: '600',
    color: Colors.black,
  },
  sectionDescription: {
    marginTop: 8,
    fontSize: 18,
    fontWeight: '400',
    color: Colors.dark,
  },
  highlight: {
    fontWeight: '700',
  },
  footer: {
    color: Colors.dark,
    fontSize: 12,
    fontWeight: '600',
    padding: 4,
    paddingRight: 12,
    textAlign: 'right',
  },
});

export default App;
Now we need to add the TouchableOpacity onPress prop. We’ll be using the alert module as an action. One issue I initially had when adding onPress props or onClick props was that I would forget to use the arrow function inside which is the ()=> portion following the onPress in the following chunk of code.
          <TouchableOpacity onPress={()=> {Alert.alert('You clicked it!', 'You clicked it!')}}>
            <Image
              source={require('./assets/test.png')}
              style={{resizeMode: 'contain', width: 250, alignSelf: 'center'}}
            />
          </TouchableOpacity>
The entire App.js file will look like this.
/**
 * Sample React Native App
 * https://github.com/facebook/react-native
 *
 * @format
 * @flow strict-local
 */

import React from 'react';
import {SafeAreaView, ScrollView, StatusBar, StyleSheet} from 'react-native';

import {Colors} from 'react-native/Libraries/NewAppScreen';

import {Image, TouchableOpacity, Alert} from 'react-native';
import test from './assets/test.png'
const App: () => React$Node = () => {
  return (
    <>
      <StatusBar barStyle="dark-content" />
      <SafeAreaView>
        <ScrollView
          contentInsetAdjustmentBehavior="automatic"
          style={styles.scrollView}>
          <TouchableOpacity onPress={()=> {Alert.alert('You clicked it!', 'You clicked it!')}}>
            <Image
              source={require('./assets/test.png')}
              style={{resizeMode: 'contain', width: 250, alignSelf: 'center'}}
            />
          </TouchableOpacity>
        </ScrollView>
      </SafeAreaView>
    </>
  );
};

const styles = StyleSheet.create({
  scrollView: {
    backgroundColor: '#ffffff',
  },
  engine: {
    position: 'absolute',
    right: 0,
  },
  body: {
    backgroundColor: Colors.white,
  },
  sectionContainer: {
    marginTop: 32,
    paddingHorizontal: 24,
  },
  sectionTitle: {
    fontSize: 24,
    fontWeight: '600',
    color: Colors.black,
  },
  sectionDescription: {
    marginTop: 8,
    fontSize: 18,
    fontWeight: '400',
    color: Colors.dark,
  },
  highlight: {
    fontWeight: '700',
  },
  footer: {
    color: Colors.dark,
    fontSize: 12,
    fontWeight: '600',
    padding: 4,
    paddingRight: 12,
    textAlign: 'right',
  },
});

export default App;
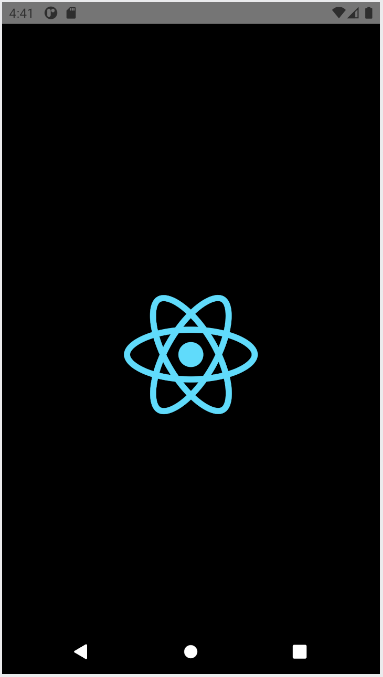
Final Product
So here’s what we’ve built. I hope I’ve helped you wrap your head around how you make an image clickable in React Native. We’ve added an image to the center of your screen and made it display an alert!
Happy coding!
Add Link To Touchable Opacity OnPress In React Native
Want To Take It One Step Further?
What if you wanted to add a link to your app or send your users to a website when they tap the Touchable component? We’re going to use `Linking`. The new code will look like:
/**
 * Sample React Native App
 * https://github.com/facebook/react-native
 *
 * @format
 * @flow strict-local
 */

import React from 'react';
import {SafeAreaView, ScrollView, StatusBar, StyleSheet, Linking} from 'react-native';

import {Colors} from 'react-native/Libraries/NewAppScreen';

import {Image, TouchableOpacity, Alert} from 'react-native';
import test from './assets/test.png'
const App: () => React$Node = () => {
  return (
    <>
      <StatusBar barStyle="dark-content" />
      <SafeAreaView>
        <ScrollView
          contentInsetAdjustmentBehavior="automatic"
          style={styles.scrollView}>
          <TouchableOpacity onPress={()=> {Linking.openURL('https://google.com')}}>
            <Image
              source={require('./assets/test.png')}
              style={{resizeMode: 'contain', width: 250, alignSelf: 'center'}}
            />
          </TouchableOpacity>
        </ScrollView>
      </SafeAreaView>
    </>
  );
};

const styles = StyleSheet.create({
  scrollView: {
    backgroundColor: '#ffffff',
  },
  engine: {
    position: 'absolute',
    right: 0,
  },
  body: {
    backgroundColor: Colors.white,
  },
  sectionContainer: {
    marginTop: 32,
    paddingHorizontal: 24,
  },
  sectionTitle: {
    fontSize: 24,
    fontWeight: '600',
    color: Colors.black,
  },
  sectionDescription: {
    marginTop: 8,
    fontSize: 18,
    fontWeight: '400',
    color: Colors.dark,
  },
  highlight: {
    fontWeight: '700',
  },
  footer: {
    color: Colors.dark,
    fontSize: 12,
    fontWeight: '600',
    padding: 4,
    paddingRight: 12,
    textAlign: 'right',
  },
});

export default App;
The only change we made was to what was inside the onPress prop of the TouchableOpacity component. This is the “action.” This will open up your URL in the users default browser.